Today I’ll be showing you how to get a Pi Zero W setup with re4son kernel and local access through USB. This kernel is pretty old, but we’re not really worried about old, unsecured kernels right now, are we? Let’s start with the hardware we’ll be using. I’ll include links below.. I don’t get any kick back from these vendors, so if you can find them cheaper somewhere else, go for it!
- Raspberry Pi Zero W – Adafruit
- MicroSD Card (Vendor doesn’t matter) – SanDisk 64GB Ultra
- USB Dongle Expansion Breakout (Optional) – iUniker USB Dongle
I won’t do too much talking, but just give you the basics. Remember, use this for good hacking, not bad hacking 😉
Let’s go ahead and get our OS installed. Here’s the trick that stumped me for a while. I made the mistake of going to Raspberrypi.com and grabbing the latest kernel. Unfortunately that doesn’t work since the kernel we’re replacing hasn’t been updated in three years. Is there a work around? No clue.. I didn’t find one and I’m pretty good at google-fu.
Let’s setup the OS.
Here’s the link to get your ISO downloaded. Download the Stretch Lite zip.
Use a program like rufus to burn your ISO onto your micro sd card. Nothing too special about this step.
You may have to go into disk manager and add a drive to the new readable partition you created. You should be able to access the ‘BOOT’ partition. We’ll need to make some changes to a few files.
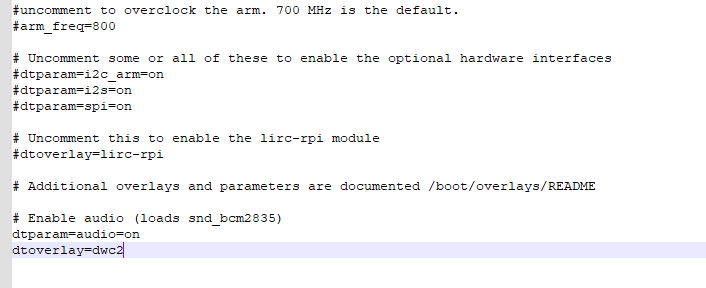
Open the config.txt file and add the following line to the bottom of the file.
dtoverlay=dwc2
Next let’s modify the cmdline.txt file. Add the following line after rootwait.
modules-load=dwc2,g_ether

One more thing before we disconnect the drive and fire up our Pi. Go ahead and create a file on the boot partition so we can SSH in. Create a file on the boot partition called ssh

Next step is covered really well in this article Adafruit. No need to re-invent the wheel. Scroll down in the article and look for Advanced Networking (Fixed IP). This will give the pi a static IP and allow us to use internet connection sharing. In case you need the RNDIS drivers, here’s the link to the one that worked for me.
Once you’ve finished those steps, let’s go ahead and SSH into the pi. Just for reference, the default credentials for SSH access it pi / raspberry. I’m going to assume your pi now has internet and that you’re able to connect via SSH.
If you’re having issues with internet connection sharing, check out the pwnagotchi scripts: https://github.com/evilsocket/pwnagotchi/blob/master/scripts/win_connection_share.ps1
Time to install the re4son kernel.
Using PuTTy or equivalent, let’s SSH into our pi. Connect to your pi’s new ip address, in our case it’s 192.168.7.2. The default credentials are: pi / raspberry
Time to install some re4son kernel files. Head on over to the re4son-kernel site. We’re going to use the manual installation instructions.
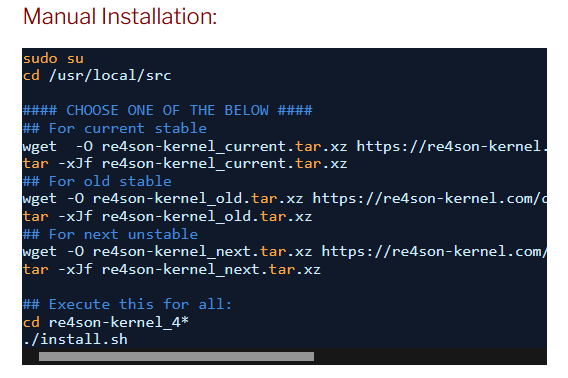
Be sure not to ignore the first steps.. change over to root with the sudo su command then let’s go to the /usr/local/src folder.
Run these commands:
sudo su
cd /usr/local/src
wget -O re4son-kernel_current.tar.xz https://re4son-kernel.com/download/re4son-kernel-current
tar -xJf re4son-kernel_current.tar.xz
cd re4son-kernel_4*
./install.sh
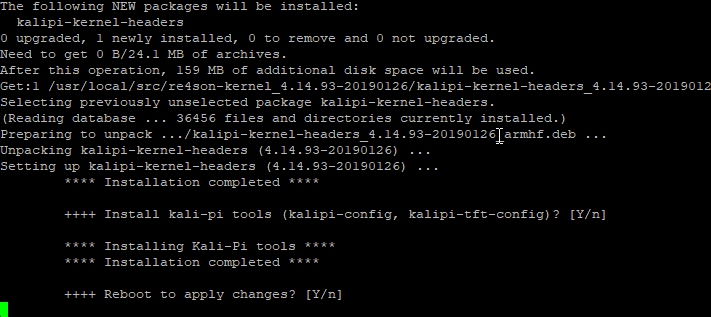
While this is running, you will be asked a few questions. Obviously we want to answer Yes to the Install Re4son-Kernel. This process will take a bit of time.. probably around 15 or 20 minutes if I had to guess. Answer Yes to all the other questions that are asked! This will install some headers and whatnot. Reboot when you’re all finished.
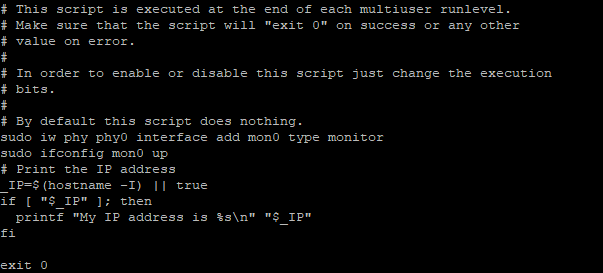
Let’s setup a monitor interface, this will come in handy later on. To do this, edit the rc.local file with this command: sudo nano /etc/rc.local Add the following lines to the end of the file.
sudo iw phy phy0 interface add mon0 type monitor
sudo ifconfig mon0 up
Your file will look a little something like this:
After a reboot, we should see the mon0 show up when we run the iwconfig command.

Time to install aircrack-ng
Aircrack-ng is a great program for cracking wifi even without bettercap, but bettercap sure does make it purdy.
sudo apt update
sudo apt install aircrack-ng
Run this after the install to kill any processes that might make our wireless capture impure!
sudo airmon-ng check kill
Let’s confirm everything is happy, happy. Run the following command and you should see it populate with local wifi networks.
sudo airodump-ng mon0
If you see a screen similar to the image below, then you’ve done everything right so far!
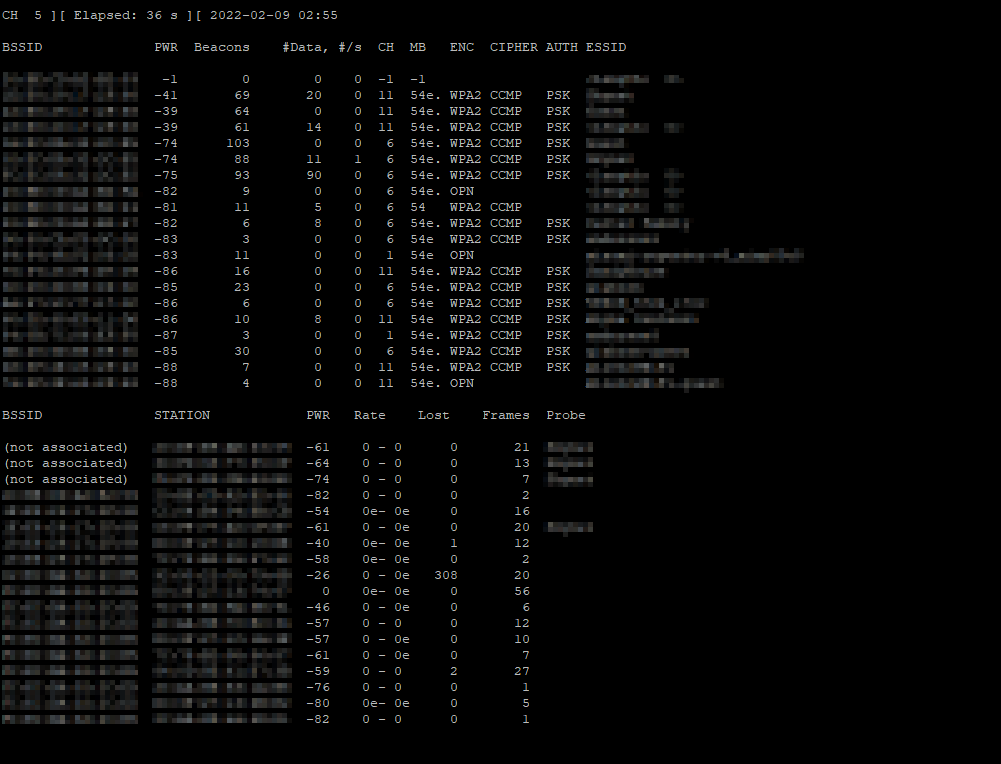
CTRL-C to exit out and proceed with the next steps.
Let’s do some updates.. it’s about that time!
sudo apt update
sudo apt upgrade -y
Once those updates finish, we can now move on to installing Bettercap. Let’s start off with some required software:
sudo apt install -y golang git build-essential libpcap-dev libusb-1.0-0-dev libnetfilter-queue-devIn order for you to build from source, I suggest checking out this script (https://github.com/canha/golang-tools-install-script). If you’re good with the script, let’s fire it up.
wget -q -O - https://git.io/vQhTU | bash
After the script finishes, close out SSH an re-open the window or you can reboot. The next few steps will take some time to complete. Have patience, it will finish eventually. If you’re running this on a pi zero, expect a wait.
go get github.com/bettercap/bettercapOnce finished, you can find the executable in the go/bin/ folder. You may execute it by using:
sudo ~/go/bin/bettercap
You can copy this executable to a folder in your PATH by doing this:
sudo cp ~/go/bin/bettercap /usr/local/bin
Good news is that we’re almost done! Almost time to jump into bettercap and start hacking some wifi! Let’s make sure bettercap is up to date
sudo bettercap -eval "caplets.update; ui.update; q"
Once you’re all updated, you’re ready to launch the web browser.
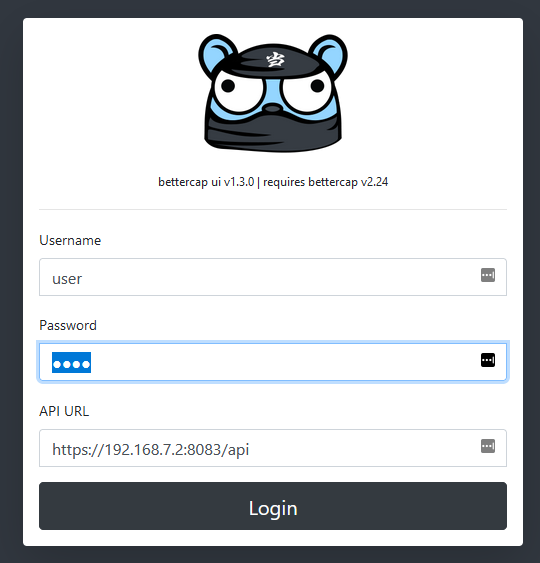
sudo bettercap -caplet https-uiThis will generate some SSL certs (self-signed, of course). The process of generating a cert will take the pi around 5 minutes or so. It should let you know that you can navigate to the site when it’s done. If you’re following this guide, the address is probably https://192.168.7.2
Default username and password is user / pass. If you’d like to secure that, quit out of the bettercap console and edit this file: /usr/local/share/bettercap/caplets/https-ui.cap
What you do from here is your choice! There’s a lot of really cool features in bettercap that this article won’t be covering. I encourage you to explore the WiFi and BLE pages. You’d be surprised the commands you can send to bluetooth devices (BLE). Hope this article helps you have some fun with wifi. If you notice any incorrect information in this article, please let me know!
Update (2-13-22)
Want bettercap to start up on boot? Create a file in the /etc/systemd/system folder called bettercap.service. I made my file a little different than the one on the github page. I wanted my service to start up the https site. Here is my bettercap.service
[Unit]
Description=bettercap api.rest service.
Documentation=https://bettercap.org
Wants=network.target
After=network.target

[Service]
Type=simple
PermissionsStartOnly=true
ExecStart=/usr/local/bin/bettercap -caplet https-ui -no-colors
Restart=always
RestartSec=30

[Install]
WantedBy=multi-user.target
Now, let’s enable the service with the following commands:
chmod 644 /etc/systemd/system/bettercap.service
systemctl enable bettercap.service
systemctl start bettercap.service
You should have a running service now. You can always stop it with systemctl stop bettercap.service if you prefer to run it manually and see the console.